
|
|
New Kindle eBook!
New Kindle eBook!
[an error occurred while processing this directive] [an error occurred while processing this directive] |
The documents and information on this site may be used solely for personal, informational, non-commercial purposes, and may not be modified or altered in any way. The text, images and sound files on this Site may not be distributed in any manner including posting on web sites.
Schematic and PCB Tutorial AMZ Simple Jfet Buffer - A one-transistor project for which I did a board layout to use as an example. This page includes the schematic and the pcb cad file for download. The circuit is a basic buffer on a small board that has many uses on the pedalboard. High impedance input and low impedance output drive to preserve the full range of your guitar's sound New 12 May 2007
Line driver and Buffer AMZ Super Buffer - Drive long cables and multiple pedal chains with this unique buffer circuit. Mix and match opamp chips for different sounds. New 1 Jan 2005
A Fixed Version of the E-H Dr. Q The original Electro-Harmonix Dr. Q envelope controlled filter is a classic, but there are several improvements that can be made. It has a low input impedance and many dual opamps won't work in the circuit because of the way the rectifier section is biased. The Dr. Quack is an improved version with an added input buffer and the rectifier section has been fixed so any dual opamp works with the circuit. Get the schematic and make your own auto-wah!
At the request of the members of the Stompbox Forum, I have created this versatile high gain overdrive. It was made by combining the following circuit fragments: input gain stage is the Muffer, followed by the IC gain stage of the Fat Gnat, a tone control from the Fender Pro Roc amp and the output buffer of a TS-808! High gain boutique sound at its best, though not a clone of any existing pedal. Here are some ideas for mods that can allow you to customize the sound for the best response with your gear:
What does it sound like? Download this clip of the AMZ Overdrive Pro provided by Tony Baxter.
Download the complete schematic for all the details of this project. There is a pcb layout available on Tonepad and you can also see reviews from people who have built this design. Read the reviews.
Clean Gain Stage
A Beginner's Project
If D1, D2 and C3 are not used, the circuit will amplify without distorting. This is useful in overdriving a tube amp input as a clean boost or providing a boost to a weak guitar signal. When the diodes and capacitor are added, the circuit will become a simple distortion box. The transistor is not too critical. Use the 2N3904, 2N2484, 2N5088, BC108 or similar NPN silicon devices. When used as a distortion, the 10uF/C3 capacitor controls high content to some extent. Make it smaller to add some brightness or leave it as shown for full range. The diodes may be replaced with germanium types for a different clipping response though I would use 4 diodes (2 pairs) to keep the output volume at a higher level. The circuit is laid out on the pcb so that you can follow the schematic to visualize how the design goes together. The dpdt switch can be eliminated and the jacks connected to the pcb IN and OUT if you do not need to be able to switch the booster out of the signal path. You can build the Muffer (as a boost without the diodes) on the AMZ Multi-Purpose PCB. Order one of these boards and build this easy project!
Muffmaster
The classic Rangemaster is thought to have been the source of some of the best tones in rock guitar, from Clapton's Beano sound to some of Brian May's singing sustain tones. While the effect is a simple one-transistor booster, locating a good quality germanium transistor to use in building a clone of the Rangemaster can be a problem. Furthermore, germanium transistors will drift in bias and gain as the temperature of the transistor changes. If we use the basic Muffer circuit and tweak the values of a few of the components we can produce a simple booster that has a lot of the character of the Rangemaster while being more stable and built from easy to find parts. This booster is best used to overdrive the input of a tube amp or otherwise create a bright boosted response. The gain of the Muffer circuit has been reduced and input capacitor made smaller to create the proper frequency response. The Muffmaster can be made using the Muffer pc board layout shown above with the pads for D1, D2 and C3 left empty, or it can be built on the AMZ Multi-Purpose PCB. The transistor can be almost any NPN silicon device and the same devices listed for the Muffer may be used. The current draw is low and therefore the battery should last a long time. Because the response of silicon transistors to overload is different from that of germaniums, the sound will not be an exact duplicate of the classic effect but it is interesting and useful nonetheless. This cheap booster provides a lot of bang for the bucks - try it out!
Fuzzface
C1 and C2 are aluminum electrolytics and C3 may be mylar or similar. The Fuzz pot should be linear taper and the Volume audio taper. Quarter-watt carbon film or metal film resistors are acceptable. A dpdt bypass switch may be used as shown in the schematic of the project above. The two pots are mounted off the pc board and connected to it by short jumper wires. The ground should connect to the ground lug on either the input or output jack. The input is shown as a stereo jack since by connecting the battery negative to the ring connection, the effect may be switched on when a plug is inserted into the jack. A standard mono plug will ground the ring connection and make the circuit from the battery negative to ground to power up the device.
MOS-Face
Use an audio taper pot for the volume and a linear taper for the Fuzz control. This project can be built on the same pcb as the Fuzzface shown above. The mosfet would be dropped in with its d-g-s leads going to the c-b-e pads respectively. Check out this interesting variation of the frequently used two-transistor distortion.
Shaka 5
from US Patent 5,032,796
 I was looking through some patents related to solid-state emulation of the tube sound, and found the US Patent No. 5,032,796, which had been assigned to St. Louis Music. I would have to guess that this is the basis of the tube-type sound in the Crate� amplifiers. It is an unusual design that dynamically varies the dc bias of the opamp to change the clipping points as the signal varies in volume. This will produce dynamically changing harmonics that the inventor claims is similar to the sound of overdriven vacuum tubes.
I took the basic design as presented in the patent and refined it into a working model with 2 stages in series as shown in this schematic. In order to have enough headroom for the circuit to be able to change the dc levels, it is necessary to power this circuit from more than 9v, so a pair of batteries are used to provide the extra voltage.
It is generally accepted that you may build one device from a patent for personal use, but certainly do not sell any units based on this patent. Note that the drawing on the front page of the patent has an error - it includes an extra diode that is not shown in the final design.
4 inputs to 1 output
Each of the 4 inputs has about 100k ohms impedance which should be adequate although they may be increased in value to raise the input Z. Increasing the value of the input resistor will reduce the gain of that input channel. Gain for each input is fixed at about 1.5 and is determined by the value of R2/R1 (150k/100k). The opamp is shown as a TL071 but any similar device, such as an LF356 may be used. It is best to stay with a jfet opamp for best results and lowest noise. Even a dual is okay if the input pins of the second opamp are grounded. An input may be muted by connecting the input point (negative side of the C1) to ground. A simple mod is to put an SPST footswitch on an input and when it is toggled, that input will be silenced. This comes in handy if the mixer is used on stage with more than one guitar plugged into it at once, since otherwise the guitar volume would have to be turned down to 0 each time it is not used. All four inputs may be used simultaneously with no problems. The frequency response is flat and wide enough that it may be used with a bass guitar without cutting the low notes. A power supply of 18v is recommended though 30v will give even more clean headroom. Parallel R2 with a small value capacitor to eliminate stray radio frequencies that may be picked up by the circuit. An easy way to power this circuit is with two 9v batteries in series. If a stereo jack is used on the output, the negative battery connection may be tied to the jack's ring connector which will cause the circuit to be powered up anytime a plug is inserted into the output. Removing the plug from the output jack will disconnect the batteries. If you are not clear as to how this works, look at the schematic of the Tubetype Distortion project immediately above, where the input jack is used for switching the two batteries. A quick summary of some simple mods:
More ready-to-solder pc boards and projects are available, including multi-purpose transistor boosters and buffers, the Mini-Booster, and the AMZ Mosfet Booster.
Fat Gnat Fet Muff Son of Screamer Fuxx Face
AMZ-FX Home Page
Lab Notebook Main Page
Guitar Effects Blog
©2000-2021 Jack Orman
|
 Guitar Effects Explained reveals the inside workings of stompboxes in easy to understand language.
 Guitar FX Mods: ProCo Rat is an indepth look at the circuit in one of the classic effects pedals of all time.
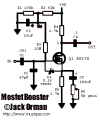 A simple clean boost pedal with low power requirements based on a single easy-to-find mosfet transistor. It provides a high impedance input that will not load down any combination of guitar pickups.
  I wanted to do a simple project that would be easy and cheap for a beginner to build.
A good single transistor design can do the job well. Let's just extract a section of the
classic Big Muff, modify it slightly and use it as a single booster stage. It can provide over 30db of gain
and will be fairly low noise.
I wanted to do a simple project that would be easy and cheap for a beginner to build.
A good single transistor design can do the job well. Let's just extract a section of the
classic Big Muff, modify it slightly and use it as a single booster stage. It can provide over 30db of gain
and will be fairly low noise.
 This is a project that will boost the available voltage from a 9v battery or power supply to almost 18v (there is always some loss in the diodes). It is refined slightly over the basic 7660-type circuit and a
  The Opamp Multipurpose project is actually many projects that can be built on the same pc board, including a direct box, booster, buffer and more.